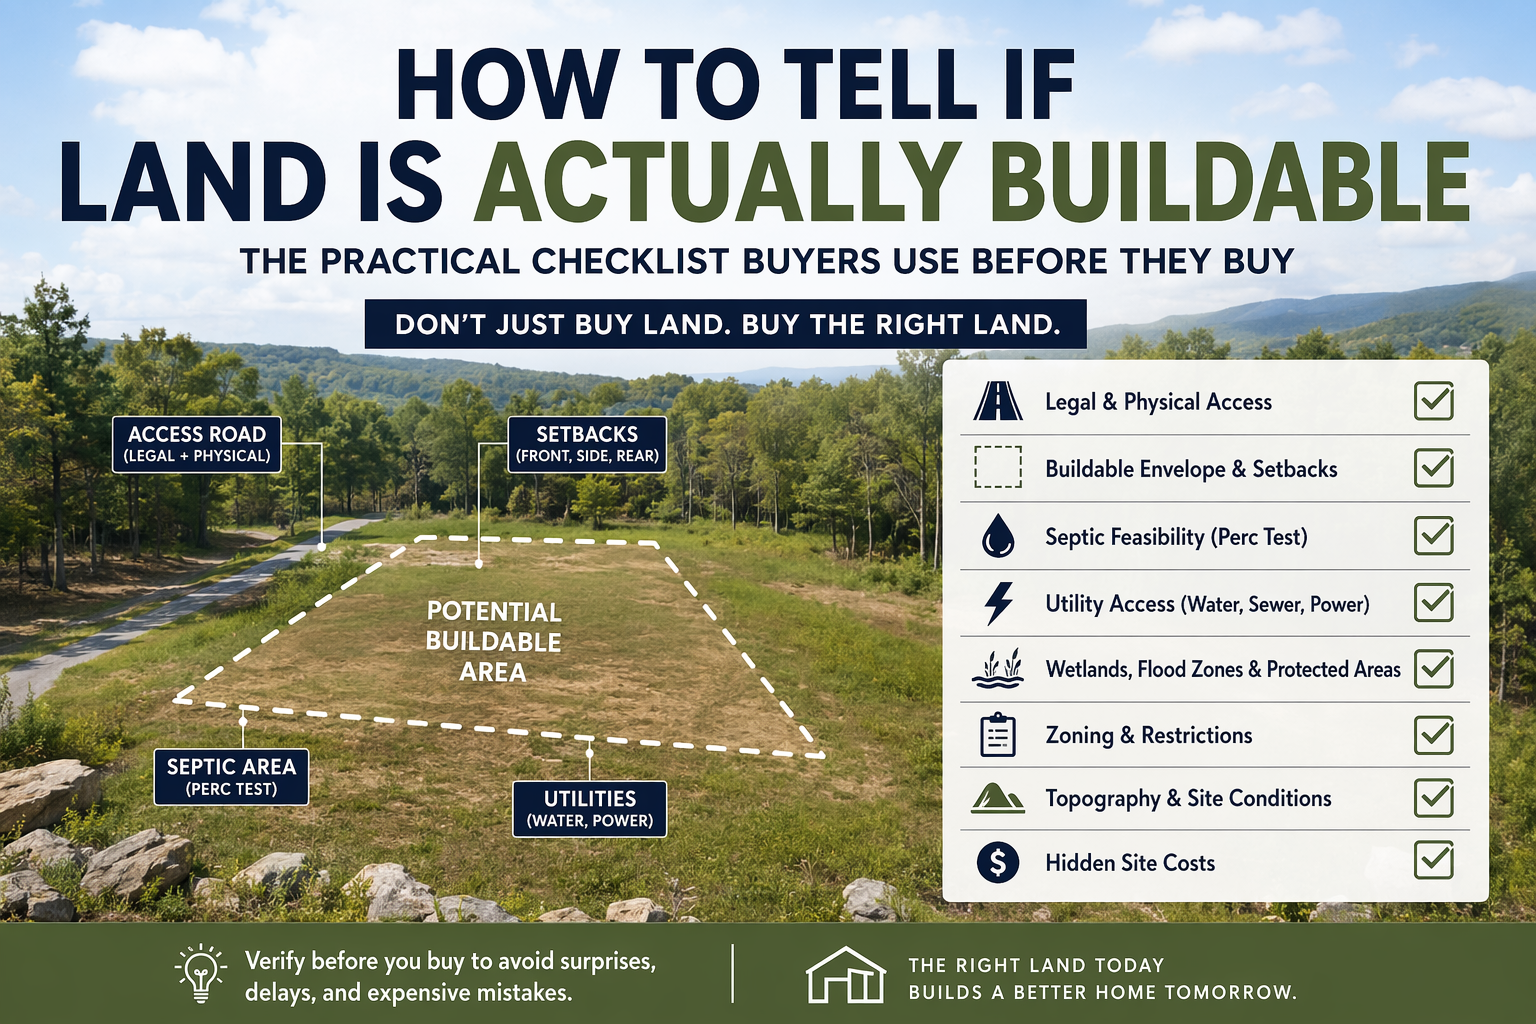
The practical checklist designers, builders, and engineers use before committing to a property
🏡 Introduction: Vacant Land vs. Buildable Land
At first glance, most land looks buildable.
It’s open. It’s quiet. It has space.
Maybe it even has a beautiful view.
But here’s the truth:
👉 Vacant land and buildable land are not the same thing.
A property can be legally for sale—and still:
- Fail a septic test
- Lack legal access
- Be restricted by zoning
- Sit in a flood zone
- Or cost far more to build on than expected
This article walks you through how professionals evaluate land before building, so you can make a confident, informed decision before you buy.
🔍 Step 1: Confirm Legal and Physical Access
Before anything else, ask:
Can I legally and physically get to this property?
You need both:
✔️ Legal Access
- Direct frontage on a public road or
- A recorded (deeded) right-of-way or easement
✔️ Physical Access
- A driveway that can realistically be built
🚩 Red Flags
- “Landlocked” parcels
- Verbal agreements (not recorded)
- Extremely steep or wooded access routes
👉 If you can’t access the land properly, you can’t build—period.
📏 Step 2: Understand the Buildable Envelope
Just because you own the land doesn’t mean you can build anywhere on it.
The buildable envelope is the portion of the lot where construction is allowed after accounting for:
- Setbacks (front, side, rear)
- Easements (utilities, drainage, access)
- Environmental restrictions
Why This Matters
A 3-acre lot might only have:
- ½ acre—or less—of usable building area
Irregular lot shapes or multiple restrictions can make:
- Home placement difficult
- Driveway layout challenging
- Septic placement limited
👉 This is where many buyers realize too late that their dream layout won’t fit.
🚽 Step 3: Confirm Septic Feasibility (Perc Test)
If public sewer is not available, this step is critical.
You’ll need:
- A perc (percolation) test
- Soil evaluation by a licensed professional
What It Determines
- Whether the soil can absorb wastewater
- What type of septic system is required
Possible Outcomes
- ✔️ Pass → Standard septic system
- ⚠️ Conditional → Engineered or alternative system (more expensive)
- ❌ Fail → No build allowed
🚩 Red Flags
- No prior testing
- Failed or expired perc results
- Limited area for drain field
👉 No septic approval = no home on most rural properties.
⚡ Step 4: Evaluate Utility Access
Next, determine how the property will be serviced.
Key Questions
- How far is the nearest power line?
- Is public water available?
- Is internet accessible?
If Utilities Are Not Available
You may need:
- A well for water
- A septic system for wastewater
- Extended electrical service
Cost Considerations
- Long utility runs = higher costs
- Trenching, transformers, permits
- Possible upgrades to existing infrastructure
👉 A “cheap” lot can quickly become expensive when utilities are added.
🌧️ Step 5: Check for Wetlands, Flood Zones, and Protected Areas
Environmental constraints can limit—or completely prevent—construction.
What to Look For
- FEMA flood zone maps
- Wetlands (federal, state, or local)
- Streams, buffers, or conservation areas
Potential Impacts
- Restricted building areas
- Required permits and mitigation
- Higher insurance costs
- In some cases… no building at all
🚩 Red Flags
- Standing water
- Marshy or soft ground
- Nearby creeks or tidal areas
👉 Environmental restrictions are often non-negotiable.
📜 Step 6: Review Zoning and Local Regulations
Zoning determines what you’re allowed to build.
Verify:
- Property zoning classification
- Minimum lot size requirements
- Allowed uses (single-family, agricultural, etc.)
- Building height limits
- Accessory structure rules
Also Check:
- HOA or deed restrictions
- Architectural guidelines
- Subdivision covenants
🚩 Red Flags
- Restrictions on home size or style
- Limits on garages, workshops, or additions
- Conflicting regulations
👉 You may own the land—but the rules control what you can build.
⛰️ Step 7: Evaluate Topography and Site Conditions
The physical shape of the land has a major impact on cost.
Key Factors
- Slope (flat vs. steep)
- Elevation changes
- Rock or ledge
- Tree density
Cost Implications
- Grading and excavation
- Retaining walls
- Foundation design complexity
- Tree clearing
👉 A steep or rocky lot can significantly increase your construction budget.
💰 Step 8: Identify Hidden Site Costs
This is where everything comes together.
Even if land is technically buildable, ask:
What will it cost to make it build-ready?
Common Hidden Costs
- Driveway construction
- Clearing and grading
- Septic system installation
- Well drilling
- Utility extensions
- Stormwater management systems
- Engineering and permits
👉 Two similar properties can differ by tens of thousands of dollars once site work is considered.
🧠 The Professional Approach: Don’t Guess—Verify
Designers, builders, and engineers don’t rely on assumptions.
They:
- Review surveys and plats
- Coordinate soil testing
- Verify zoning and setbacks
- Evaluate site conditions
- Estimate site development costs
👉 The goal is simple: eliminate surprises before the purchase.
📋 Practical Land Evaluation Checklist
When you’re seriously considering a property, walk through this:
- ✔️ Legal and physical access confirmed
- ✔️ Buildable envelope identified
- ✔️ Septic feasibility verified
- ✔️ Utilities evaluated
- ✔️ Flood zones and wetlands checked
- ✔️ Zoning and restrictions reviewed
- ✔️ Topography assessed
- ✔️ Site development costs estimated
If any of these are unclear, pause before moving forward.
🔗 How This Fits Into the Bigger Picture
This article ties directly into the rest of the series:
- Designer Involvement → Helps evaluate all of the above early
- Utilities & Septic → Explains infrastructure costs in detail
- Zoning & Setbacks → Breaks down regulatory limits
- Slopes, Soil & Drainage → Explores cost impacts of land conditions
Together, they give you a complete picture of what it really takes to build on a piece of land.
🧭 Final Thoughts: Buildability Is About Certainty
Buying land without verifying buildability is one of the biggest risks in the homebuilding process.
The goal isn’t to find perfect land.
It’s to find land where you can confidently say:
✔️ “I know what I can build.”
✔️ “I understand the costs.”
✔️ “There are no major surprises waiting for me.”
That’s what turns a piece of land into a successful home project.
📣 Ready to Evaluate a Property with Confidence?
If you’re considering a specific piece of land and want a professional opinion before you move forward, I can help you evaluate it and avoid costly mistakes.
Leave a Reply